
Intro #
Suricata is an open-source network threat detection engine used for intrusion detection, intrusion prevention, and network security monitoring. It inspects network traffic in real time, compares packets and flows against security rules, and generates alerts when it detects suspicious activity such as exploit attempts, malware communication, port scanning, or unusual traffic patterns. In passive IDS mode, Suricata monitors traffic and writes alerts to logs such as eve.json without blocking connections, making it useful for observing and analyzing network behavior before enabling more advanced prevention or response actions.
In this article, we are going to show how to use the free IP2Location LITE DB1 MMDB file to utilize basic geolocation to filter network traffic alerts. Please note that our demo machine is a Debian 13 so our steps will be specifically designed for that.
Download the IP2Location LITE DB1 MMDB file #
We are going to use the IP2Location LITE DB1 MMDB file to provide the geolocation data. If you don’t have an account, please register at https://www.ip2location.com/database/lite so you can download that file. After that, login to the dashboard. Then, you can click on the Download section and look for the below. Click on the download button to get the file.

Extract the IP2LOCATION-LITE-DB1.MMDB from your downloaded zipped file and upload it to your server under your home directory.
Run the following commands in the server while under your home directory:
sudo mkdir -p /usr/local/share/GeoIP
sudo cp IP2LOCATION-LITE-DB1.MMDB /usr/local/share/GeoIP/
sudo chmod 644 /usr/local/share/GeoIP/IP2LOCATION-LITE-DB1.MMDB
Installing Suricata #
As mentioned before, we are using steps specific to Debian 13. For other platforms, please refer to the Suricata download page.
Run the commands below:
sudo apt update
sudo apt install suricata jq
sudo systemctl stop suricata
There are 2 packages being installed, one is obviously Suricata while the other is the jq package which we’ll use later to parse the JSON output by Suricata. We also stopped the Suricata service after installation as we’ll need to make changes to the configuration file.
Before we move on to the next step, let’s just check to make sure that the Suricata package has GeoIP support enabled.
Run the below to check:
suricata --build-info | grep -i geo
Determine the correct network interface #
The default network interface specified in Suricata is eth0 which may not be correct for modern systems. In fact, if your network interface does not match the Suricata configuration, then the Suricata service may not be able to start up successfully.
Run the below to check for the correct interface:
ip -br addr
As shown above, for our system, the network interface should be ens5 instead of eth0.
Configuring the alert rule #
In order for Suricata to log down an alert, we need to specify the criteria in a rule file. In our case, we would like to log down an alert whenever network traffic comes from Canada (CA) or Germany (DE).
So, let’s create the rule file called local.rules which is a very simple example.
sudo nano /var/lib/suricata/rules/local.rulesWrite below into that file:
alert ip any any -> any any (msg:"GeoIP test - source from CA/DE"; geoip:src, CA,DE; sid:1000011; rev:1;)Save the file.
Configuring Suricata #
In the suricata.yaml file, we will need to search for and modify various settings.
Let’s edit the file:
sudo nano /etc/suricata/suricata.yamlNext, search for the af-packet section and modify the default interface to our correct interface from above which is ens5.
af-packet:
  - interface: ens5
To specify which MMDB file to use in our geolocation, look for the geoip-database setting and modify as below (if it is commented out, you can just uncomment that line):
geoip-database: /usr/local/share/GeoIP/IP2LOCATION-LITE-DB1.MMDBUnder the rule-files sections, make sure local.rules is loaded and remove the default suricata.rules:
rule-files:
  - local.rules
Just double-check to make sure the eve-log section is configured similar to the below. We only want to keep the alert type and remove the rest to keep the log from being too noisy.
outputs:
  - eve-log:
      enabled: yes
      filename: eve.json
      types:
        - alert
Save your changes to the suricata.yaml file.
Run the below to test the configuration file:
sudo suricata -T -c /etc/suricata/suricata.yaml
Start Suricata and generate some test traffic #
Run the below to start Suricata and reset any potential start up errors earlier:
sudo systemctl reset-failed suricata
sudo systemctl start suricata
If you have any servers in Canada or Germany, you can use those to ping your test server. That will generate some form of network traffic. Otherwise, you need to wait till some bots or scanners from those countries send traffic to your server.
Run the below to check for alerts:
sudo tail -f /var/log/suricata/eve.json | jq 'select(.event_type=="alert")'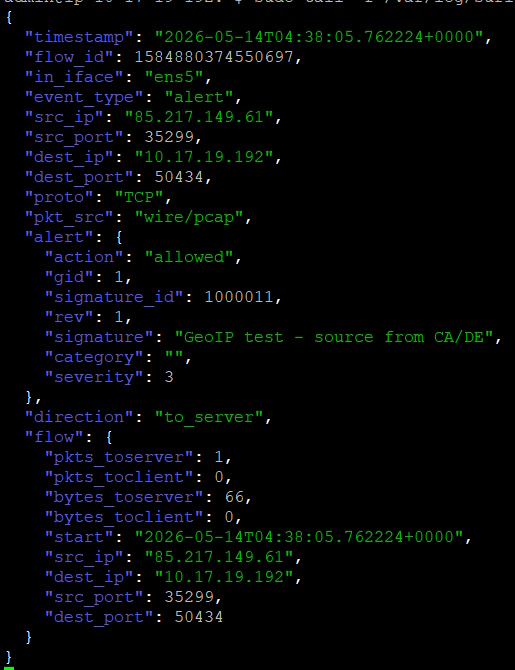
Conclusion #
That’s basically all you have to do in Suricata to take advantage of the IP2Location LITE DB1 MMDB data to filter network traffic alerts.
If you require more IP geolocation data in your log, do consider the use of the IP2Location Logstash plugin to post-process the eve.json so that you can enrich the log with further geolocation data. Or if you need to detect proxy servers and their proxy types, there is also the IP2Proxy Logstash plugin for those kinds of data.


