

In this article, we’ll delve into how to add IP address data and determine the geolocation in Kafka.
Apache Kafka is a distributed event store and stream-processing platform. It is great for handling real-time data feeds due to high-throughput and low-latency. Kafka is run by a cluster of machines called brokers.
A topic in Kafka is similar to a database table. It can be used to write and read data. Producers are client applications that write or publish data to Kafka whereas consumers are client applications that read or consume those data.
Kafka is usually used to ingest data from multiple dissimilar sources like files or databases. The resulting data is then written out to other systems which can be files or databases. When data moves (import & export) between Kafka and external systems, it is possible perform transformations on the data. Common transformations include adding more data fields to the existing struct or modifying the existing data.
What is Kafka Connect? #
Kafka Connect is the framework for connecting Apache Kafka with external systems such as files, databases and more. The components responsible for communicating between Kafka and external systems are called connectors.
Source connectors are used to read data from external sources and writing them into Kafka. On the other hand, sink connectors do things in the opposite direction. There are many ready-made connectors available to perform import and export of data between Kafka and other commonly used data systems.
What is geolocation? #
IP geolocation is the mapping of an IP address to its geographical location. Geolocation is used by many industries for various purposes. Websites use geolocation to customize their page contents to appeal to localized tastes.
Marketing departments can analyse sales conversions of online customers to optimize their marketing efforts. Security-minded companies rely on geolocation when analysing their logs to prevent unauthorized access to their online resources.
Online stores also include IP geolocation as part of their fraud detection mechanism by detecting user’s geolocation vs. the address in their orders. IP2Location is one of the providers of geolocation databases and API.
How does IP2Location Kafka transformation work? #
As mentioned above, transformations are used to add or modify data in Kafka when being imported from or exported to external systems. Let’s go through a simple demo to see how to add geolocation in Kafka and how IP2Location Kafka transform works.
Steps to add geolocation in Kafka #
Install and start the Kafka servers #
If you don’t have Apache Kafka installed yet, download the latest version and get started. Extract it after the download, then modify the below for the version you’ve downloaded and run it in a terminal.
tar -xzf kafka_2.13-3.2.1.tgz
cd kafka_2.13-3.2.1
To start ZooKeeper, run the below:
bin/zookeeper-server-start.sh config/zookeeper.properties
To start the Kafka broker, open a new terminal and run the below:
bin/kafka-server-start.sh config/server.properties
Time for our demo #
Now that Kafka is up and running, let’s get our demo going. For our demo, we’ll be using the connect-file-source and connect-file-sink connectors to read IP address from a file and write the IP geolocation data into another file.
Prerequisites #
Our demo relies on the IP2Location Kafka and IP2Location Java so let’s download both.
First, download the latest IP2Location Java jar file ip2location-java-x.y.z.jar from https://search.maven.org/artifact/com.ip2location/ip2location-java.
Next, download the latest IP2Location Kafka jar file ip2location-kafka-x.y.z.jar from https://search.maven.org/artifact/com.ip2location/ip2location-kafka.
After that, copy both jar files into whichever plugin folder your Kafka installation is using.
In addition, you’ll need to download the IP2Location BIN database file which contains the IP geolocation data. The complete database is available at https://www.ip2location.com for better accuracy and contains more advanced data. Meanwhile, the LITE database is available for free at https://www.ip2location.com/database/lite.
Download the zipped file and extract the BIN file into the folder of your choice.

Configuring the source connector #
Now, open a new terminal and edit the connect-file-source.properties file.
nano config/connect-file-source.properties
Paste & save the following into the file:
name=local-file-source
connector.class=FileStreamSource
tasks.max=1
file=test.txt
topic=quickstart-events
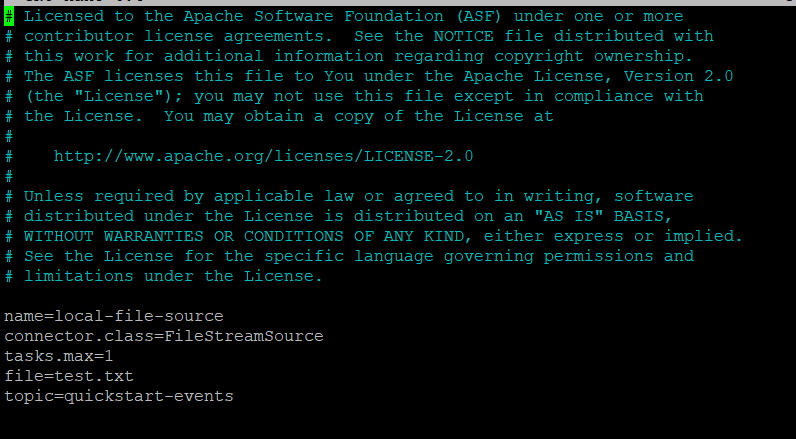
Our input file that contains the IP addresses is called test.txt and our topic is called quickstart-events.
Configuring the sink connector #
Next, edit the connect-file-sink.properties file.
nano config/connect-file-sink.properties
Paste & save the following into the file:
name=local-file-sink
connector.class=FileStreamSink
tasks.max=1
file=test.sink.txt
topics=quickstart-events
transforms=MakeMap, insertip2location
# This is to change the input to struct
transforms.MakeMap.type=org.apache.kafka.connect.transforms.HoistField$Value
transforms.MakeMap.field=ip_address
transforms.insertip2location.type=com.ip2location.kafka.connect.smt.InsertIP2Location$Value
# Set these required values
transforms.insertip2location.ip2location.bin.path=/home/admin/data/DB26-IPV6.BIN
transforms.insertip2location.ip2location.input=ip_address
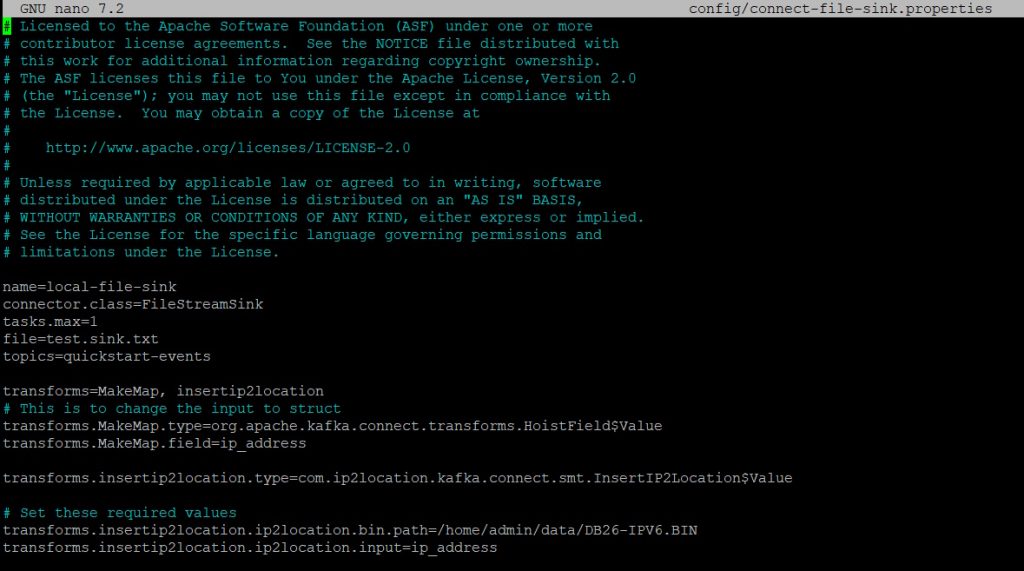
We’ve specified the file called test.sink.txt as our output to store the IP geolocation info. Our topic should be the same as the other one. There are 2 transformations in our properties file. This is because our input will be just a plain string containing an IP address.
The MakeMap transformation will hoist the string field and turn it into a struct with a field named ip_address. The next transformation is the IP2Location Kafka transform where 2 parameters need to be set.
Modify the first parameter called transforms.insertip2location.ip2location.bin.path which is the full path to the IP2Location BIN database file that was downloaded earlier. You can leave the 2nd parameter alone unless you’ve modified the field name in the first transformation.
Starting the Connect process for geolocation in Kafka demo #
Open a new terminal and run the below to start the connect process.
bin/connect-standalone.sh config/connect-standalone.properties config/connect-file-source.properties config/connect-file-sink.properties
Open a new terminal and run the below to input an IP address into our test.txt.
echo "8.8.8.8" >> test.txt
Check the test.sink.txt and you’ll see the below:
Struct{ip_address=8.8.8.8,ip2location_country_code=US,ip2location_country_name=United States of America,ip2location_region=California,ip2location_city=Mountain View,ip2location_latitude=37.40599,ip2location_longitude=-122.078514,ip2location_zip_code=94043,ip2location_time_zone=-07:00,ip2location_isp=Google LLC,ip2location_domain=google.com,ip2location_net_speed=T1,ip2location_idd_code=1,ip2location_area_code=650,ip2location_weather_station_code=USCA0746,ip2location_weather_station_name=Mountain View,ip2location_mcc=-,ip2location_mnc=-,ip2location_mobile_brand=-,ip2location_elevation=32.0,ip2location_usage_type=DCH,ip2location_address_type=A,ip2location_category=IAB19-11,ip2location_district=San Diego County,ip2location_asn=15169,ip2location_as=Google LLC}

That’s how you add the IP2Location geolocation data into your Kafka data.
Conclusion #
Flexibility of Kafka to work with many dissimilar data systems make it highly useful for many real-world scenarios. Now with the IP2Location Kafka, it’s so easy to enrich enterprise data with IP geolocation data to fulfil many use cases.


