Django is a free and open-source Python-based web framework, and is one of the most popular web frameworks in the world. Web developers can easily kick-start their website development by using Django. In addition, web developers often have a variety of choices to choose from when it comes to external packages to aid in web development. Those packages can help with improving the user experience and reducing hassle for managing a website. For example, a site admin can use packages to detect where their site visitors are coming from. Such information will help with designing region-specific content. In this article, we will show you how to use the IP2Location Python package and the IP2Location BIN database to get geolocation data for a user’s IP address.
Installation #
Before we start, you are required to download and install the following components in your server:
- IP2Location Python Library
- You can download and install from here: https://github.com/ip2location/IP2Location-Python
- IP2Location Database
- You can purchase a commercial database from https://www.ip2location.com/database/ip2location. This article will use the commercial DB25 for demonstration purpose. In addition, you can also get a free IP2Location LITE database from https://www.ip2location.com/database/lite. However, the LITE database will not have the complete list of data.

Steps #
- Open your terminal, and create a new Django project by using the following command:
django-admin startproject mysite - A new folder with the name mysite will be created. Cd to the folder, and type the following command to create a new Django app:
python manage.py startapp myapp. - We will then start to create the view of the app. Open the mysite/myapp/views.py file, and add the following code into the file:
from django.shortcuts import render
from django.template import loader
import IP2Location

database = IP2Location.IP2Location(YOUR_DATABASE_PATH)

def get_client_ip(request):
    x_forwarded_for = request.META.get('HTTP_X_FORWARDED_FOR')
    if x_forwarded_for:
        ip = x_forwarded_for.split(',')[0]
    else:
        ip = request.META.get('REMOTE_ADDR')
    if ip == '127.0.0.1': # Only define the IP if you are testing on localhost.
        ip = '8.8.8.8'
    return ip

def hello(request):
    ip = get_client_ip(request)
    rec = database.get_all(ip)
    template = loader.get_template('myapp/hello.html')
    context = {
        'ip': ip,
        'country_short': rec.country_short,
        'country_long': rec.country_long,
        'region': rec.region,
        'city': rec.city,
        'isp': rec.isp,
        'latitude': rec.latitude,
        'longitude': rec.longitude,
        'domain': rec.domain,
        'zipcode': rec.zipcode,
        'timezone': rec.timezone,
        'netspeed': rec.netspeed,
        'idd_code': rec.idd_code,
        'area_code': rec.area_code,
        'weather_code': rec.weather_code,
        'weather_name': rec.weather_name,
        'mcc': rec.mcc,
        'mnc': rec.mnc,
        'mobile_brand': rec.mobile_brand,
        'elevation': rec.elevation,
        'usage_type': rec.usage_type,
        'address_type': rec.address_type,
        'category': rec.category,
        'district': rec.district,
        'asn': rec.asn,
        'asname': rec.as_name,
    }
    return HttpResponse(template.render(context, request))
- In the same directory, create a new file called urls.py. Open this file, and add the following code into it:
from django.urls import path

from . import views

urlpatterns = [
    path('', views.hello, name='hello'),
]
- We will also need to create a template file for displaying the result. Under the myapp folder, create a new folder called templates, and under the templates folder create another new folder called myapp.
- Inside the mysite/myapp/templates/myapp folder, create a new html file called hello.html. Copy the following code into the html file:
<html>

   <body>
      <p>IP: {{ip}}</p>
      <p>Country Code: {{country_short}}</p>
      <p>Country Name : {{country_long}}</p>
      <p>Region Name: {{region}}</p>
      <p>City Name: {{city}}</p>
      <p>ISP Name: {{isp}}</p>
      <p>Latitude: {{latitude}}</p>
      <p>Longitude: {{longitude}}</p>
      <p>Domain Name: {{domain}}</p>
      <p>ZIP Code: {{zipcode}}</p>
      <p>Time Zone: {{timezone}}</p>
      <p>Net Speed: {{netspeed}}</p>
      <p>Area Code: {{area_code}}</p>
      <p>IDD Code: {{idd_code}}</p>
      <p>Weather Station Code: {{weather_code}}</p>
      <p>Weather Station Name: {{weather_name}}</p>
      <p>MCC: {{mcc}}</p>
      <p>MNC: {{mnc}}</p>
      <p>Mobile Carrier: {{mobile_brand}}</p>
      <p>Elevation: {{elevation}}</p>
      <p>Usage Type: {{usage_type}}</p>
      <p>Address Type: {{address_type}}</p>
      <p>Category: {{category}}</p>
      <p>District: {{district}}</p>
      <p>ASN: {{asn}}</p>
      <p>AS Name: {{asname}}</p>
   </body>

</html>
- In order to make sure that the page can be found and loaded, we still need to do some configuration. Open the mysite/mysite/urls.py, and add the following line in the urlpatterns list:
path('myapp/', include('myapp.urls')), - Open the mysite/mysite/settings.py, and add the following line into the INSTALLED_APPS list:
'myapp', - Remember to save all the changes. Next, change back to the project root directory and use the following command to start a Django development server:
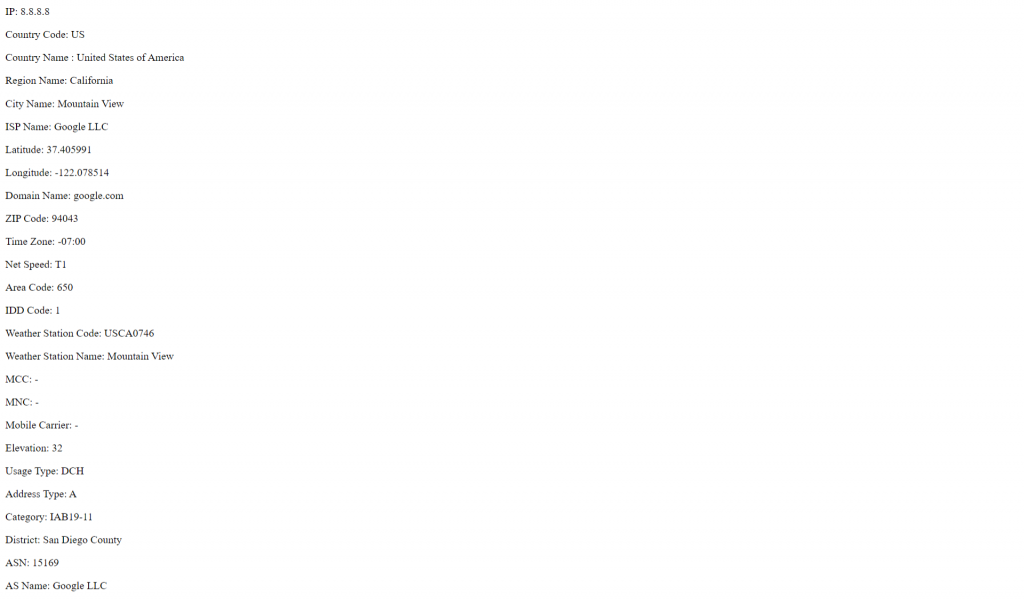
python manage.py runserver - Now you can go to your browser, and navigate to the link http://127.0.0.1:8000/myapp/ to see the outcome. You will see a similar output displayed in the screenshot below.