

Intro #
FastAPI is a modern Python web framework for building APIs (Application Programming Interfaces) quickly and efficiently. It’s designed to be fast, easy to use, and production-ready – especially for applications involving JSON APIs, data validation, and asynchronous programming.
FastAPI‑Guard is a single-package solution to secure FastAPI applications at the network and application‑API layer. It handles IP-based access, rate-limiting, suspicious payload detection, geoblocking, and logging – with optional per-route decorators.
In this article, we’ll cover how to setup a simple API with FastAPI and how to configure it with FastAPI-Guard running IP2Location.io API as the geolocation handler.
Pre-requisites #
First, you’ll need the IP2Location.io API key. If you don’t have one, you can sign up for a free API key at https://www.ip2location.io/pricing.
Our demo system is a Debian 12 so the steps we show will be specific to that platform. You’ll need to install Python 3 if your system does not have it installed.
Install Python 3 #
Run the commands below to install python3 and related packages.
sudo apt update
sudo apt install python3 python3-venv python3-pip
Create test project folder #
Create the folder that will contain our test code as well as the Python virtual environment. Then, navigate into that folder.
mkdir ~/my-fastapi-app
cd ~/my-fastapi-app
Setup & activate Python virtual environment #
We will be running our code inside a Python virtual environment so all the pip packages installed will be within this environment. Run the below commands to create the virtual environment called “venv” and then activate it.
python3 -m venv venv
source venv/bin/activate

If you see (venv) at the start of your prompt, you’re good.
Install FastAPI and related packages #
We’ll need to install fastapi as well as the security middleware fastapi-guard. We’ll also need to install uvicorn. Uvicorn is a lightweight, super-fast ASGI server for running modern Python web apps, especially frameworks like FastAPI. Lastly, we will need to install httpx as we are calling the IP2Location.io API to retrieve the IP geolocation data.
Run the below to install the necessary packages.
pip install fastapi uvicorn httpx fastapi-guard
If you want to freeze the dependencies, you can run the below.
pip freeze > requirements.txt
Our simple API and country blocking codes #
Below is our test code. Copy & paste into main.py in the root of the test project folder. Remember to replace your IP2Location.io API key into the code.
This simple API will just output “Hello, world!†if the user’s visitor IP address is not from Singapore (SG) and not from Japan (JP). Anyone calling this API from a Singaporean or Japanese IP address will see a Forbidden status as the FastAPI-Guard middleware is blocking them.
Inside the code, you’ll see a custom GeoIPHandler called IP2LocationHandler which is the code that will retrieve the IP geolocation data from the IP2Location.io API.
from fastapi import FastAPI
from guard.middleware import SecurityMiddleware
from guard.models import SecurityConfig
from guard.protocols.geo_ip_protocol import GeoIPHandler

import httpx
import logging

IP2LOCATION_API_KEY = "YOUR_API_KEY"

# Custom GeoIP handler using IP2Location
class IP2LocationHandler(GeoIPHandler):
    def __init__(self):
        self._initialized = True

    @property
    def is_initialized(self) -> bool:
        return self._initialized

    async def initialize(self) -> None:
        self._initialized = True

    async def initialize_redis(self, redis_handler: "RedisManager") -> None:
        pass  # Optional redis init

    def get_country(self, ip: str) -> str | None:
        try:
            url = f"https://api.ip2location.io/?key={IP2LOCATION_API_KEY}&ip={ip}"
            resp = httpx.get(url, timeout=5)
            if resp.status_code == 200:
                data = resp.json()
                return data.get("country_code")
            else:
                logging.warning(f"IP2Location lookup failed: {resp.text}")
        except Exception as e:
            logging.error(f"IP2Location error: {e}")
        return None

# FastAPI app
app = FastAPI()

# Add the security middleware
app.add_middleware(
    SecurityMiddleware,
    config=SecurityConfig(
        enabled=True,
        geo_ip_handler=IP2LocationHandler(),
        blocked_countries=["SG", "JP"],
    )
)

@app.get("/")
async def root():
    return {"message": "Hello, world!"}
Test the code to see if the blocking is working #
To get the API running, just run the below command.
uvicorn main:app --reload --host 0.0.0.0 --port 8000
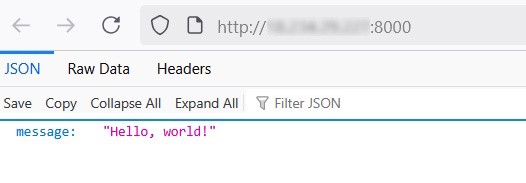
When I call the page from Malaysia, I can see the “Hello, world!†message. So, this means I am not being blocked.
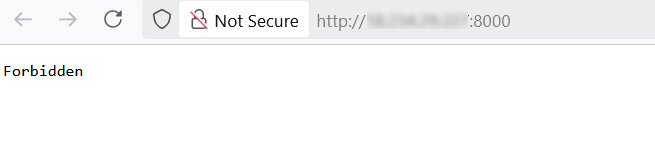
But when I used a IP address from Singapore or Japan, I see the same thing which is “Forbiddenâ€.
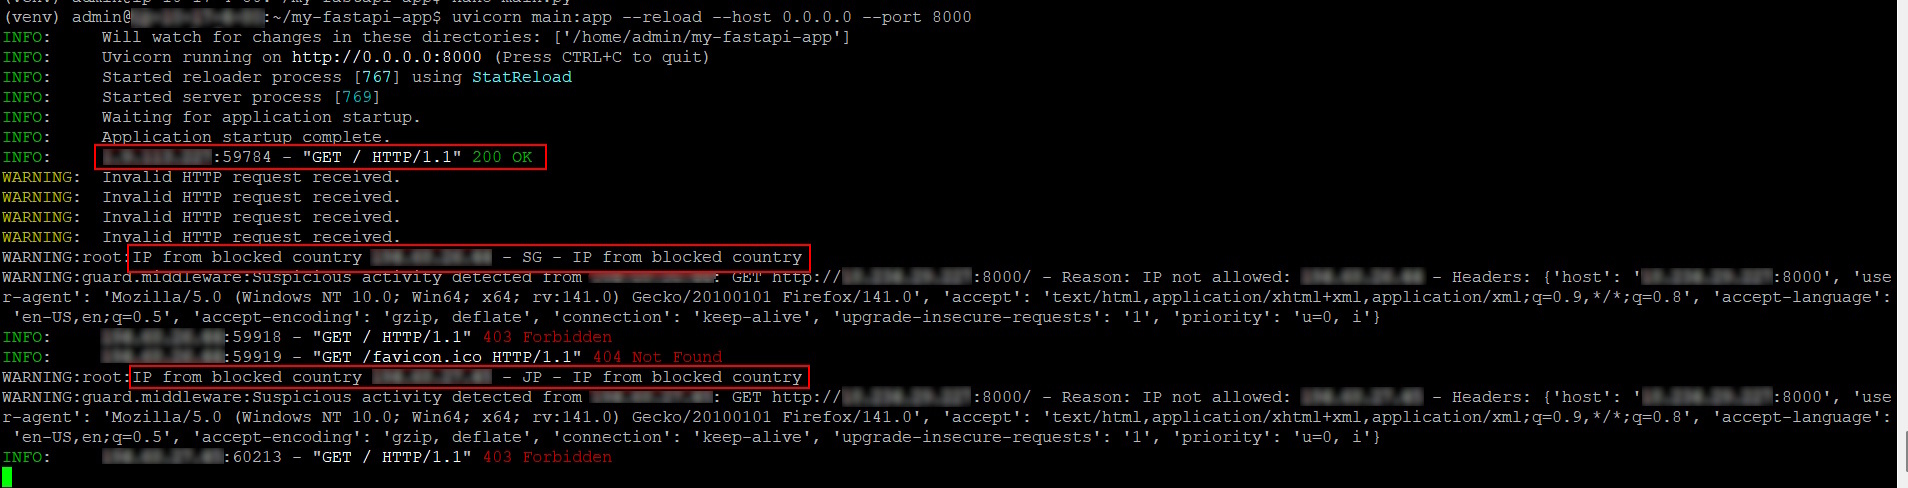
You can also see in the terminal output below. At first, you can see that the Malaysia IP address went through successfully. Then, you can see the Singapore IP address being blocked. Same with the Japan IP address.
Conclusion #
It is quite straightforward to add a geolocation handler in fastapi-guard to get geolocation data from any custom source. In our case, we are using the IP geolocation data returned by the IP2Location.io API. However, you can easily modify the handler to read from a data file or database.


