Introduction
Flask is a Python micro web framework that does not rely on any particular tool or library to work. Because of it’s simplicity and lightweight nature, many websites had adapted Flask into their backend, such as Pinterest and LinkedIn. Flask allows developers to use any third party extensions to add more functionality. For example, developers can utilize a geolocation lookup extension to lookup for the geolocation information of their visitor. In this article, we will show you how to use IP2Location.io and IP2WHOIS API to perform geolocation and domain WHOIS lookup in Flask.
Prerequisite
Before we start, you will be required to install the following components into your server.
- IP2Location.io Python SDK
- To perform geolocation lookup, you need to install it using this command:
pip install ip2location-io.
- To perform geolocation lookup, you need to install it using this command:
- IP2WHOIS Python SDK
- To perform domain WHOIS lookup, you need to install it using this command:
pip install IP2WHOIS.
- To perform domain WHOIS lookup, you need to install it using this command:
You will also need a IP2Location.io API key to perform any type of lookup. You can sign up for a free IP2Location.io API key, or purchase a plan according to your need.
Steps
- In your local server, create a new directory called mywebsite, and navigate to the directory.
- Create a new file called app.py, and paste the following code into the file:
from flask import Flask, render_template, jsonify, request
import ip2locationio
import ip2whois

app = Flask(__name__)

@app.route('/geolocation-lookup')
def geolocation_lookup():
    if request.environ.get('HTTP_X_FORWARDED_FOR') is None:
        ip = request.environ['REMOTE_ADDR']
    else:
        ip = request.environ['HTTP_X_FORWARDED_FOR']
    if ip == '127.0.0.1': # Happened in Windows, if the IP got is 127.0.0.1, need to substitute with real IP address
        ip = '8.8.8.8' # Google Public IP

    # Configures IP2Location.io API key
    configuration = ip2locationio.Configuration('YOUR_API_KEY')
    ipgeolocation = ip2locationio.IPGeolocation(configuration)

    rec = ipgeolocation.lookup(ip)
    return render_template('display_ip2locationio_result.html', data=rec)

@app.route('/whois-lookup')
def index():
    domain = "locaproxy.com" # We will use a fixed value for domain name in this tutorial, but you can always change it to accept input from a form or url.

    # Configures IP2WHOIS API key
    ip2whois_init = ip2whois.Api('YOUR_API_KEY')

    # Lookup domain information
    results = ip2whois_init.lookup(domain)
    return render_template('display_ip2whois_result.html', data=results)

if __name__ == '__main__':
    app.run(debug=True)
- Create a new sub directory called templates. Then, in the templates folder, create two new html files called display_ip2locationio_result.html and display_ip2whois_result.html. Paste the following contents into both files respectively:
<!-- display_ip2locationio_result.html -->
<!DOCTYPE html>
<html lang="en">
<head>
    <meta charset="UTF-8">
    <meta name="viewport" content="width=device-width, initial-scale=1.0">
    <title>IP Information</title>
    <style>
        body {
            font-family: Arial, sans-serif;
            margin: 20px;
        }
        table {
            width: 100%;
            border-collapse: collapse;
            margin-bottom: 20px;
        }
        table, th, td {
            border: 1px solid #ccc;
        }
        th, td {
            padding: 10px;
            text-align: left;
        }
        th {
            background-color: #f4f4f4;
        }
    </style>
</head>
<body>
    <h1>IP Information for {{ data.ip }}</h1>
    <table>
        <tr>
            <th>Field</th>
            <th>Value</th>
        </tr>
        <tr>
            <td>IP</td>
            <td>{{ data.ip }}</td>
        </tr>
        <tr>
            <td>Country Code</td>
            <td>{{ data.country_code }}</td>
        </tr>
        <tr>
            <td>Country Name</td>
            <td>{{ data.country_name }}</td>
        </tr>
        <tr>
            <td>Region Name</td>
            <td>{{ data.region_name }}</td>
        </tr>
        <tr>
            <td>City Name</td>
            <td>{{ data.city_name }}</td>
        </tr>
        <tr>
            <td>Latitude</td>
            <td>{{ data.latitude }}</td>
        </tr>
        <tr>
            <td>Longitude</td>
            <td>{{ data.longitude }}</td>
        </tr>
        <tr>
            <td>Zip Code</td>
            <td>{{ data.zip_code }}</td>
        </tr>
        <tr>
            <td>Time Zone</td>
            <td>{{ data.time_zone }}</td>
        </tr>
        <tr>
            <td>ASN</td>
            <td>{{ data.asn }}</td>
        </tr>
        <tr>
            <td>AS</td>
            <td>{{ data.as }}</td>
        </tr>
        <tr>
            <td>Is Proxy</td>
            <td>{{ data.is_proxy }}</td>
        </tr>
    </table>
</body>
</html>
<!-- display_ip2whois_result.html -->
<!DOCTYPE html>
<html lang="en">
<head>
    <meta charset="UTF-8">
    <meta name="viewport" content="width=device-width, initial-scale=1.0">
    <title>Domain Information</title>
    <style>
        body {
            font-family: Arial, sans-serif;
            margin: 20px;
        }
        table {
            width: 100%;
            border-collapse: collapse;
            margin-bottom: 20px;
        }
        table, th, td {
            border: 1px solid #ccc;
        }
        th, td {
            padding: 10px;
            text-align: left;
        }
        th {
            background-color: #f4f4f4;
        }
    </style>
</head>
<body>
    <h1>Domain Information for {{ data.domain }}</h1>
    <table>
        <tr>
            <th>Field</th>
            <th>Value</th>
        </tr>
        <tr>
            <td>Domain</td>
            <td>{{ data.domain }}</td>
        </tr>
        <tr>
            <td>Domain ID</td>
            <td>{{ data.domain_id }}</td>
        </tr>
        <tr>
            <td>Status</td>
            <td>{{ data.status }}</td>
        </tr>
        <tr>
            <td>Create Date</td>
            <td>{{ data.create_date }}</td>
        </tr>
        <tr>
            <td>Update Date</td>
            <td>{{ data.update_date }}</td>
        </tr>
        <tr>
            <td>Expire Date</td>
            <td>{{ data.expire_date }}</td>
        </tr>
        <tr>
            <td>Domain Age</td>
            <td>{{ data.domain_age }} days</td>
        </tr>
        <tr>
            <td>Whois Server</td>
            <td>{{ data.whois_server }}</td>
        </tr>
        <tr>
            <td>Registrar</td>
            <td>
                Name: {{ data.registrar.name }}<br>
                URL: <a href="{{ data.registrar.url }}" target="_blank">{{ data.registrar.url }}</a><br>
                IANA ID: {{ data.registrar.iana_id }}
            </td>
        </tr>
        <tr>
            <td>Registrant</td>
            <td>
                Name: {{ data.registrant.name }}<br>
                Organization: {{ data.registrant.organization }}<br>
                Address: {{ data.registrant.street_address }}, {{ data.registrant.city }}, {{ data.registrant.region }} {{ data.registrant.zip_code }}, {{ data.registrant.country }}<br>
                Phone: {{ data.registrant.phone }}<br>
                Fax: {{ data.registrant.fax }}<br>
                Email: {{ data.registrant.email }}
            </td>
        </tr>
        <tr>
            <td>Admin</td>
            <td>
                Name: {{ data.admin.name }}<br>
                Organization: {{ data.admin.organization }}<br>
                Address: {{ data.admin.street_address }}, {{ data.admin.city }}, {{ data.admin.region }} {{ data.admin.zip_code }}, {{ data.admin.country }}<br>
                Phone: {{ data.admin.phone }}<br>
                Fax: {{ data.admin.fax }}<br>
                Email: {{ data.admin.email }}
            </td>
        </tr>
        <tr>
            <td>Tech</td>
            <td>
                Name: {{ data.tech.name }}<br>
                Organization: {{ data.tech.organization }}<br>
                Address: {{ data.tech.street_address }}, {{ data.tech.city }}, {{ data.tech.region }} {{ data.tech.zip_code }}, {{ data.tech.country }}<br>
                Phone: {{ data.tech.phone }}<br>
                Fax: {{ data.tech.fax }}<br>
                Email: {{ data.tech.email }}
            </td>
        </tr>
        <tr>
            <td>Billing</td>
            <td>
                Name: {{ data.billing.name }}<br>
                Organization: {{ data.billing.organization }}<br>
                Address: {{ data.billing.street_address }}, {{ data.billing.city }}, {{ data.billing.region }} {{ data.billing.zip_code }}, {{ data.billing.country }}<br>
                Phone: {{ data.billing.phone }}<br>
                Fax: {{ data.billing.fax }}<br>
                Email: {{ data.billing.email }}
            </td>
        </tr>
        <tr>
            <td>Nameservers</td>
            <td>
                <ul>
                    {% for nameserver in data.nameservers %}
                        <li>{{ nameserver }}</li>
                    {% endfor %}
                </ul>
            </td>
        </tr>
    </table>
</body>
</html>
- In your terminal, navigate to the project directory, and run the following command to start the local server:
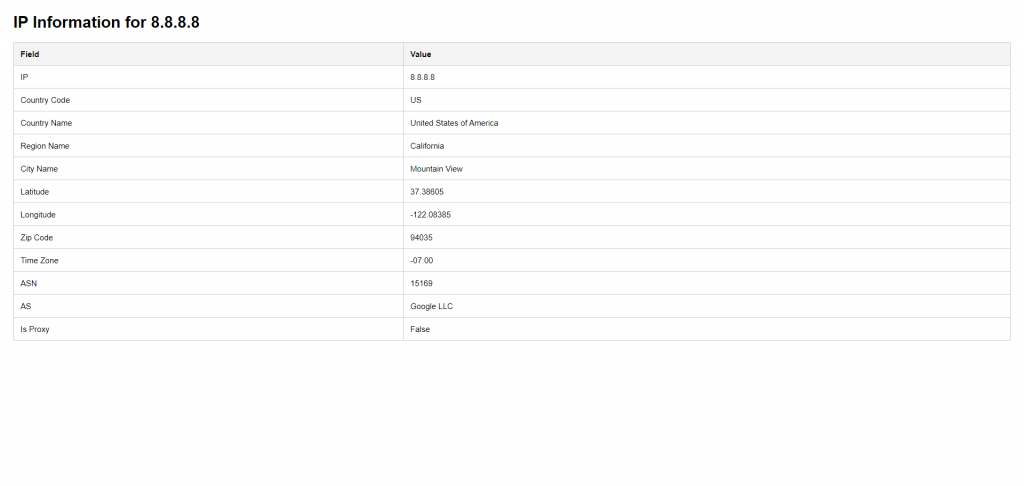
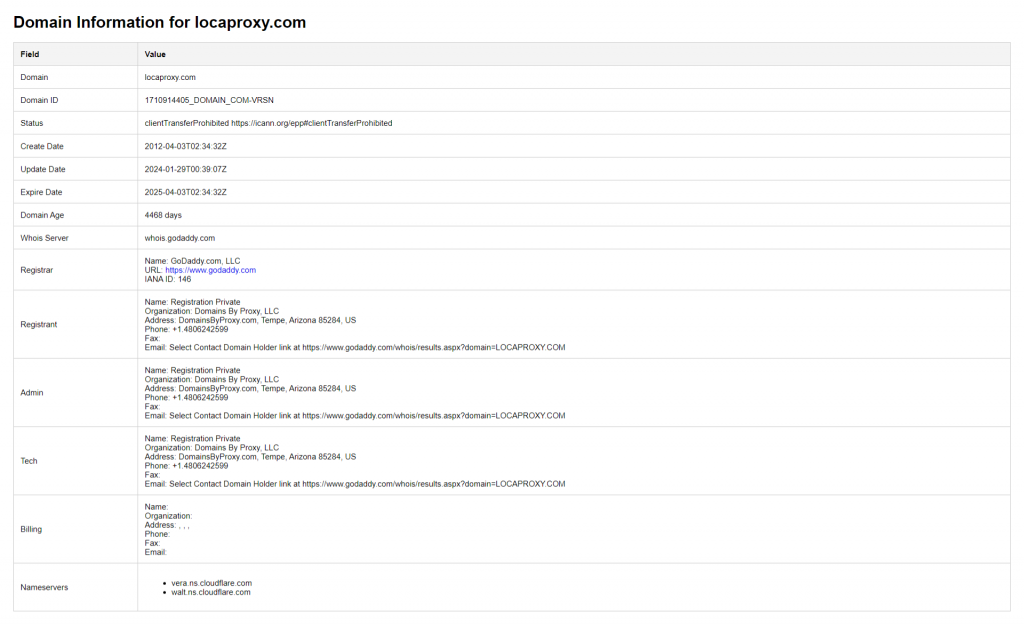
flask run. Take note that if you named the app.py to other name such as website.py, the command will becomeflask --app website runinstead. - Now you can go to your browser, and navigate to the link http://127.0.0.1:5000/geolocation-lookup and http://127.0.0.1:5000/whois-lookup to see the results. You will see similar outputs displayed in the screenshot below.


